COM addins (Office Developer Edition)
1999-02-18 Addins 0 48
Earlier versions of Office had 9 different add-in models. All of these models had different attributes for startup, shutdown, registering, behaviour, language and communication between applications. This is now history, a COM Add-In has full access to the objectmodels in Office.
What can a COM Add-In do?
- All objectmodels are available for you as a developer.
- Supports events, included application level events, and can perform a task according to these events.
- You can add buttons to a CommandBar and display different user interfaces.
- The position and size of the Office applications main windows can be controlled.
- Any Office application can be controlled from another Office application.
- You can control other applications that have an objectmodel that is accessible for you as a developer, included other 3rd party applications that licenses VBA version 6.
How to create a COM Add-In with Office Developer Edition
You will need the the Office Developer Edition to be able to create a COM Add-In, no other versions of Office can be used. You can also use a programming tool such as Visual Basic 6.Activate the VBE from any Office application by pressing Alt+F11.
Select the menu File, New Project
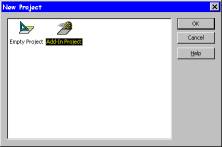
Select Add-In Project in the dialog that is displayed and click OK.
In the new dialog that is displayed, you can fill inn a descriptive name for the new add-in, and a description of what the add-in does.
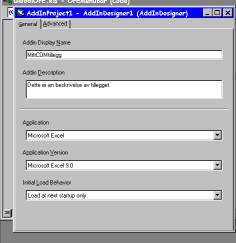
Then you select the application the add-in is to be registered for use with, and how the add-in is supposed to behave when the application is started the next time.
An add-in has these startup options:
- None: Manually by using the menu COM Add-Ins.
- Startup: Every time the application starts.
- Load on demand: Every time the add-in is requested by the user from a custom menu item or from a macro (Application.COMAddIns(x).Object, where x is replaced with the add-in name or indexnumber).
- Load at next startup only: Only the next time the application starts.
The AddinDesigner-module can be renamed in the Properties window. Right-click the new AddinDesigner object and select View, Code. In the usual code window you can fill inn the code you need for your add-in to perform your desired tasks.

The event procedure that is executed every time the add-in is started is named AddinInstance_OnConnection. The event procedure that is executed every time the add-in is closed is named AddinInstance_OnDisconnection. You can insert ordinary modules, UserForms and class modules in your COM add-in.
If you are going to create an add-in for use in multiple applications, you have to insert another AddinDesigner module. You do this by right-clicking the Designers-folder in the project window, select Insert, Addin Class, or you can use the menu Insert, Addin Class. Now you can repeat the steps described above.
When the add-in is ready you have to compile the add-in, this is done with the menu Debug, Compile AddinProjectName. To create the DLL file you select the menu File, Make AddinProjectName.DLL. You will now be prompted for a filename and path for your DLL file. When you create the DLL file, the add-in is automatically registered in the Registry, this is necessary if the application is to be able to use the add-in.
COM Add-Ins are registered in the Registry under the key HKEY_CURRENT_USER\SOFTWARE\Microsoft\Office\applicationname\AddIns (detailed information available in the MSDN Library: Microsoft Office 2000/Visual Basic Programmer's Guide chapter 11).
The VBA project itself is saved as a file with the menu File, Save As.... Keep this file for later editing of the COM add-in, you can (usually) not decompile the compiled DLL file for further editing. In other words, your distributed source code is much more protected than in add-ins created with earlier versions of Office.
When the add-in is installed on your computer, you can use the menu Tools, COM Add-Ins... to activate or deactivate the add-in. It's also possible to add or remove add-ins with this dialog. When you add or remove add-ins the Registry is automatically updated.
Before other users can use your new add-in, the COM add-in must be installed and registered like any other DLL file. The easiest way to do this is to use the new Package and Deployment Wizard that creates a setup routine with all the necessary files and applications needed for the installation and distribution of your custom solution.
How to prepare a custom project for distribution to other users:
- Save the project with the menu File, Save.
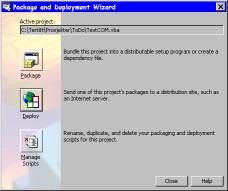
- Select the menu Add-Ins, Package and Deployment Wizard...
- Start the Package wizard that helps you pack your project for distribution.
- Start the Deploy wizard that helps you to transfer your packed project to the media you want to distribute your project with (disks, CD's, network or web).
Other users can now install your add-in with the setup-application setup.exe that is created by the Package and Deployment Wizard.
If you get any error messages when using the P&D-Wizard, you can solve your problem by changing the date format settings on your computer to American English, or you can get the fix file edit_lst.exe from Microsoft.