Replace an existing hard disk with a new one
2021-01-26 Off topic 0 19
Time had come to upgrade the harddisk on a couple of my computers, just to get some more free space.
This is what I learned in the upgrade process that someone might appreciate to know before they embark on a similar journey.
It might save you lots of frustration and time looking for a solution to why the new hard disk is not working and how to enable the old hard drive for use as an external drive.
What you need:
A new hard disk
An external enclosure with a USB cable that supports the new hard disk type (unless it fits into your computer together with the old hard disk)
Data migration or disk cloning software, e.g. Samsung has a free "Data Migration" tool available for download for their hard disks.
NOTE! The disk cloning software will most likely not be able to successfully clone the old hard disk if it has encryption enabled (e.g. BitLocker).
You will need to disable the disk encryption before cloning the old hard disk to the new hard disk.
Decrypting your old hard disk will probably take very long time...
Mount the new hard disk into the external enclosure and connect the cable to your computer.
Use the data migration or disk cloning software to clone your old hard disk over to the new hard disk.
Shut down your computer and swap the old hard disk with the new hard disk.
Your computer should start up just as before if the new hard disk has been installed properly and was successfully cloned.
NOTE! Do not install the old hard disk into the external enclosure and connect it to your computer.
See instructions below if you want to use the old hard disk as en external USB disk.
You can now enable disk encryption (e.g. BitLocker) for your new hard disk if you need this.
Enabling disk encryption may take very long time, but let it finish properly and restart your computer before continuing.
Create a USB Recovery Drive:
You will need a USB drive with at least 16GB total space, everything on the drive will be overwritten.
Type "recovery drive" into the Windows search box and start the "Recovery Drive" application as an administrator.
Make sure that this option is checked: "Back up system files to the recovery drive".
Click the "Next" button to continue and follow the wizard.
You will probably get an error message like this when you use the built in tool for creating a USB Recovery Drive:
We can’t create the recovery drive on this PC, some required files are missing.
Here is how you can fix this problem:
Close the "Recovery Drive" application if it is open.
Right-click on the Windows start menu and start the "Disk Management" application.
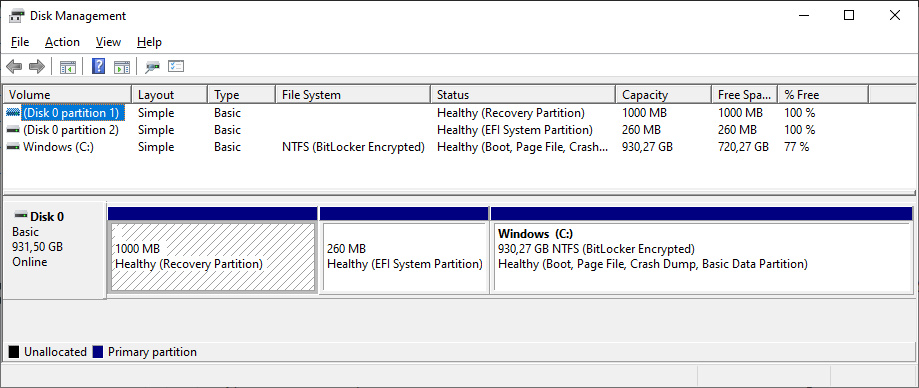
You will most likely see that your current system disk (probably "Disk 0" or the disk that has a partition named "Windows (C:)") has a small partition where it says "Healty (Recovery Partition)".
Take a note of the disk number (e.g. 0) and the size of this partition (e.g. 1000 MB) so you can identify it later.
Close the "Disk Management" application.
Type "diskpart" into the Windows search box and start the application as an administrator.
Type "list disk" and press ENTER to see a list of all available hard disks and their assigned numbers.
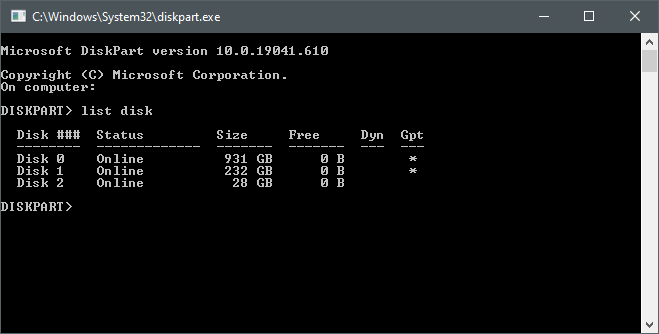
Take a note of the disk number for your system disk, it will probably be disk number 0.
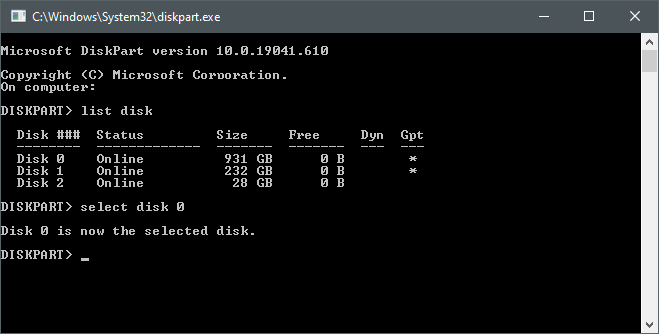
Type "select disk #" and press ENTER (replace # with your system disk number, e.g. 0)
Type "list partition" and press ENTER to see the available partitions on the disk.
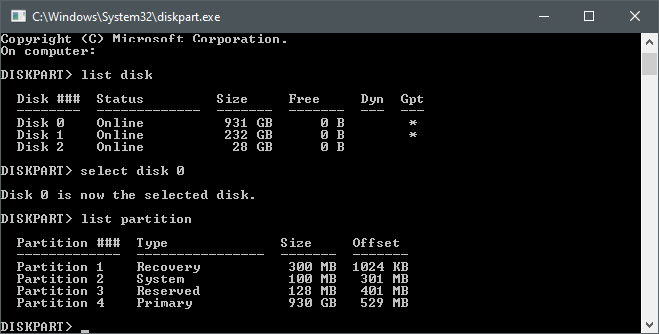
You will now be able to determine the partion number for your recovery data.
The partition you are looking for is the one that has the same size as you found in the "Disk Management" application.
It will also probably be named "RECOVERY".
Take a note of the partition number for your recovery partition, it will probably be partition number 1.
Type "exit" and press ENTER to quit diskpart.
Type "cmd" into the Windows search box and start the application as an administrator.
Type "reagentc /disable" and press ENTER.
NOTE! In the command line example below you must replace "0" with your system hard disk number and replace "1" with your recovery partition number.
Type "reagentc /setreimage /path \\?\GLOBALROOT\device\harddisk0\partition1\Recovery\WindowsRE" and press ENTER.
Type "reagentc /enable" and press ENTER.
Type "exit" and press ENTER to quit the command prompt window.
At this point I did a restart of my computer, not sure if this really was necessary.
You will now most likely be able to create your USB recovery drive unless something else is wrong.
Type "recovery drive" into the Windows search box and start the "Recovery Drive" application as an administrator.
Make sure that this option is checked: "Back up system files to the recovery drive".
Click the "Next" button to continue and follow the wizard.
Creating the USB recovery drive can take several hours.
TIPS: After creating the recovery disk, create a new empty textfile in the root folder of the recovery drive.
Give the textfile a filename that is related to the computer the recovery drive belongs to, optionally include a date too.
This will make it easier for you to identify the correct recovery drive if you have multiple computers and multiple recovery drives.
Using your old hard disk as an external disk
If your old hard disk is working properly (e.g. you changed it out to upgrade to more space, not because it was failing) you can use it as en external USB disk.
Mount the old hard disk into the external enclosure, connect to the computer only after your computer has finished starting up.
NOTE! Following the instructions below will delete all existing information on the hard disk!
You should not delete any content on your old system hard disk until you are sure that the new hard disk works properly.
Type "diskpart" into the Windows search box and start the application as an administrator.
Type "list disk" and press ENTER to see a list of all available hard disks and their assigned numbers.
Take a note of the disk number for your old hard disk, it will probably not be disk number 0.
Type "select disk #" and press ENTER (replace # with your old hard disk number, e.g. 1)
Type "list partition" and press ENTER to see the available partitions on the disk.
Repeat this until all existing partitions has been deleted from the old hard disk:
Type "select partition #" and press ENTER to select a partion (replace # with a partition number, e.g. the last one)
Type "delete partition override" and press ENTER to delete the selected partion
When all partitions have been deleted:
Type "exit" and press ENTER to quit diskpart.
Right-click on the Windows start menu and start the "Disk Management" application.
You can now format your new external drive.
After formatting it will be available as an external disk.